Followers

Thursday, October 29, 2015

Holly Fairy


Good morning folks, hope you are having a good day :) For my DT creation today I have used the gorgeous image Holly Fairy by Ching Chou Kuik available in both rubber and as a digi from Sweet Pea Stamps.

To begin with I coloured the image with Polychromos.

Next I embossed a black mat and then mounted this on red.  Next was the red lace and then it was onto the die cutting :)  The trellis is a die by Cherry Lyn and the wee holly leaves are a die from Memory Box.  I then added red crystal gems to represent the holly berries.  Finally I added some red ribbon to cover the line of the lace edge and a bow with another couple of holly leaves and some more gems.
The inside of the card was finished off using the Tattered Lace Studley die for the red and Spellbinders circles for the white writing area.  Ah, almost forgot to mention, the last bit I did was to add a Christmas sentiment using Elizabeth Craft Designs - 745 Merry Christmas die


Ingredients :-
  • Image - Holly Fairy by Ching Chou Kuik
  • Colouring medium - Polychromos
  • Dies - Cherry Lyn Trellis,  Memory Box Holly Leaves, Tattered Lace Studley, Spellbinders Circles andElizabeth Craft Designs 745 Merry Christmas die
  • From my stash - lace, gems, ribbon, gold cord
Competitions entered :-

Tuesday, October 20, 2015

Trick or Treat

Time for another challenge over at

Challenge 49
Halloween

Welcome back to the IKEsWORLD challenges :)  do pop on over to IKEsWORLD to join in the challenge, just remember, you must use and IKEsART image to be eligible for the prize.  Why not pop on over to the store too :), Ike produces the most amazing stamps, everything from off the wall to cute and fluffy :) :) :)

 For my creation this fortnight I have used the super fun Halloween image Trick or Treat.  The image was coloured with Promarkers and fussy cut, nice and simple lol. I used the Spellbinder Fancy Lattice and black card, this was then mounted onto some orange card cut using Spellbinders Grand Scalloped Ovals and the excess black lattice trimmed away.  Finally this was then mounted onto a black base also cut with Spellbinders Grand Scalloped Ovals.
It is a shame not to utilise the bits you have lying on your dest so I picked up the trimmed off lattice pieces and placed them on my orange card blank then sprayed with black and metallic spray.  Cool effect when I removed the bits, they made a great stencil :)
Finally, I used a great freaky cat die I have from the Tim Holtz - Mini Cat & Raven Set and covered him in black embossing powder, you can't see him properly in the pic above but here is a over exposed photo to show him to you.  He really makes me think he is freaking out seeing a lady clad in a few pumpkin bits hahahaha.
 Finally I added a pumpkin brad and the sentiment which comes with the digi.
For the inside of the card I used the same sprays I used for the card base front, cut a sentiment area using orange card and Spellbinders Grand Scalloped Ovals and I just could not resist using the cut off lattice bits, they seemed to be the perfect finishing touch, hope you agree :) :)

Ingredients:-
  • Image - Trick or Treat by IKEsART
  • Colouring medium - Promarkers
  • Dies - Spellbinders Fancy Lattice and Grand Scalloped Ovals and Tim Holtz - Mini Cat & Raven Set
  • From my stash - Spray inks, pumpkin brad, black embossing powder
I am entering this project into the following challenges:-

Monday, October 19, 2015

Light Yellow


This week is Artist Week and the whole team are using images by the fabulous Karen Middleton.  Karen's images are so beautifully drawn and a dream to colour :) :) :) For my creation I am using the image Light Yellow which is available from Sweet Pea Stamps in both rubber and as a digi.

For my card I first coloured the image with Promarkers and Polychromos.

To make the card I covered some white cardstock with an olive green paper which has a gold fleck which I had embossed.  Next I added a a purple die cut using Spellbinders Victorian Medllion 3 and also used the small medallion of this die set for the yellow accent.  The purple mount and image which I had triple mounted were then attached to the card with foam taps so I had lots of height.
Next I created a bouquet of flowers from my stash, used some very fine organza ribbon for the bow which was finished off with a gold heart then added a die cut sentiment from Creative Expressions and finally a purple metallic butterfly.

Ingredients:-
  • Image - Light Yellow by Karen Middleton
  • Colouring Medium - Promarkers and Polychromos
  • Dies - Spellbinders Victorian Medllion 3 and Creative Expressions Just a Note
  • From my stash - flowers, ribbon, gold heart, butterfly, pearls
Challenges entered:-


Sunday, October 18, 2015

Butterfly and Grass

Hello folks.  We have another challenge at One Stitch At A Time so how about popping over to see all the fabulous creations by the design team.  The prize this month is an awesome digi pack containing several images and a paper pack too - how cool is that.

Challenge #248

Theme 'HALLOWEEN COLOURS' 

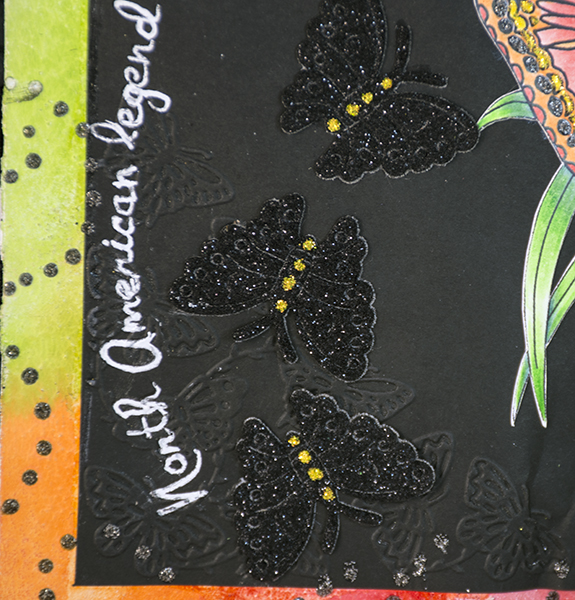
 Continuing with my journals for my kids here is another page completed.  Our challenge this week at OSAAT is Halloween Colours and saying as I don't do Halloween I thought the colours would be great for a butterfly page with a lovely American Indian saying.  The image I have used is Butterfly and Grass by Floppy Latte, not a new image but a great favourite.  I coloured the image with Polychromos and then fussy cut it.  Next I used Spectrum Noir Tints to colour the outside edge of my double page spread using the same colours I used for the image.  Time to try something new, I am useless at writing hahaha so I created my text on Illustrator and then printed it on black paper - not sure how that was going to turn out, black ink on black paper but it worked a treat.  I then went over the text with a white pen. Finally I embossed each corner of the black paper with a Tattered Lace butterfly embossing folder.
 I plan to used some die cut butterflies and so took another piece of card and went to town with the ink tints again, brushing them on first then splatting them on and finally I added some rock salt and splats of water.  So much fun and boy was I mucky after this but felt like a kid again hahaha.
 Something I have had in my stash for years are a few material black glitter butterflies, think I picked them up in a bargain basket and then tucked them away for a rainy day.  I used three of the butterflies and placed them on the black paper, these butterflies were more about a touch feely texture when you hold the book than being a visual stimulus.  Each butterfly was finished off with yellow Stickles.  On the right of the page I used the wee die cut butterflies I made from the paper above and finished them off with black Stickles.  Black and yellow stickles were also used on the coloured image and black to form swirls around the coloured border on the edges of the pages.


Ingredients:-
  • Image - Butterfly and Grass by Floppy Latte,
  • Colouring medium - Polychromos, Spectrum Noir Tints
  • Dies - Cherry Lyn Designs Mini Butterflies
  • From my Stash - Stickles, black butterflies, embossing folders, white pen
I am entering this card into the following challenges:-

Thanks for looking and hope you have a happy crafting day:)

Monday, October 12, 2015

Voyager II


Hello folks, hope you are having a good day.  Today I am sharing with you another journal page using the image Voyager II by Lucy Loo of The East Wind available from Sweet Pea Stamps in digi format.  I had a really hard time with this page, lots of grief and lots of walking away from it only to return a few hours later and ponder some more :)

To begin with I coloured the image with Polychormos and copper Promarker.  For the background I used a clock embossing folder and hammered the areas I wanted embossed - yes I used a hammer hahahah (I did not want to put this through my machine as I did not want the image to be embossed, only the surrounding area).  The image does not come with the spring, I drew that in :)

Next I covered my book pages with some paper from Kaban.  I thought the paper would be great but once I had got this far I really didn't like it and that is where it all started to become a real pain in the behind.  I keep trying to find ways to added text other than hand written and found a method of using tissue paper and embossing powder.  The tutorial said the tissue paper would be almost invisible but, well it is a bit transparent but not really invisible enough for what I had in mind grrrrrr.  Next I added some texture plastic in a few areas and then airbrushed the background with black and brown Promarkers) For the dies I used the XCut Pocket Watches die set to make my watches, I also used Graphic 45 659053 clock die set.  Another Sizzix border die was used and finished off with tiny pink gems (I managed to drop all the gems in the packed onto the floor, along with a whole box of tiny brads - as you can see this has been a trial of tribulation from start to finish hahaha).  The dies were nearly all cut using gold metal sheet, pink and black card were also used for the watch faces. The sentiment btw reads 'Sometimes your only available transportation is a leap of faith' which I thought was rather appropriate to go with the image and the spring the girl is sitting on which I added - anybody fancying this form of transport really would need to have faith :).

The final bit of work on this was to add Stampendous Frantage Micra in copper, bronze and gold, lots of yummy texture :)

Ingredients:-
  • Image - Voyager II by Lucy Loo of The East Wind
  • Colouring medium - Polychromos and Promarkers
  • Dies - XCut Pocket Watches die set and Graphic 45 659053 clock die set
  • From my stash - Frantage, gold sheet, gems, plastic mesh
Challenges entered:-

Tuesday, October 6, 2015

Marilyn

Time for another challenge over at

Challenge 48
Autumn Colours

Welcome back to the IKEsWORLD challenges :)  do pop on over to IKEsWORLD to join in the challenge, just remember, you must use and IKEsART image to be eligible for the prize.  Why not pop on over to the store too :), Ike produces the most amazing stamps, everything from off the wall to cute and fluffy :) :) :)

Oh I have loved this challenge, I had an idea as soon as I saw it and it all came together just as I hoped.  For a long time now I have wanted to used the image Marilyn by Ike, it is not available in the IKEsART store but can be found here - Marilyn.


When planning this journal page I first hunted to find a quote by Marilyn which would be suitable.  I am trying to only use quotes or sayings for my kids journals which are thought provoking, help on the path to good living or turning a negative into a positive as I believe that is the best way to get over some of the things that really hurt us, a way to put them into a box as explained so life can continue without such heavy baggage.  I have found turning negatives into positives to be my salvation, for example :) without boring you lol - I had the most miserable time of my life in a convent boarding school from the age of 8 until I could escape aged 17.  I won't go into details but the experience left me shy, lacking confidence and really just wanting to find a hole to crawl into when I could be safe and not have to deal with life.  That however is not really me, from somewhere deep inside I fought back, that is the rebel non conforming me, the one who holds little respect for authority unless it is honest hahahaha.  Anyway, I was able after some time to look back on the experience and accept it as a positive by knowing it has shaped who I am now, how I deal with life now how I survive, how I remain unflappable and happy, yep her quote really is something I can relate to.  There are loads of other examples where I have used this technique to avoid sadness, hurt, disappointment etc, and for me it really works.

Oh dear, went off track there :) sorry.  Back to my journal, I found this wonderful quote by Marilyn which you can read further down the page but for now a quick step through of what I did.  I applied Gesso to my pages and then got to thinking about the text.  I am useless at hand writing and have been plying with ways to add text to journal pages other ways, so far having tried acetate, tissue and stamping, regular printer paper etc.  Today I have tried to print on the paper I plan to cover my journal pages with, some cheap fibre paper I picked up at The Range.  As you can see, my printer totally love it ahahaha, I needed tweezers to pull it out but was pleased to see it had actually printed the text the OK even if it would not eject it properly.  The concertina effect is quite cool but I don't want that am hoped stretching onto the glued page would sort that (I don't own an iron before you suggest I should have done that ).
 As you can see the gluing of the page to my book ironed out the wrinkles just fine hahaha.  Next I fussy cut the digi image, I am not colouring her as normal but going to air brush her when all the rest of the prep is done.  Added to the pages are skeleton leaves (Marilyn loved to go for walks in woods so that is an appropriate embellishment both in keeping with the challenge colours and the digi), metal flowers, metal LOVE tag and some silk leaves in Autumn colours.
I air-brushed the pages with several shades of yellow, orange and brown Promarkers including going over the metal embellishments.
 To the centre of the metal flowers I added crystals to represent diamonds - after all Marilyn sang 'Diamonds Are A Girls Best Friend).
 Gold pen, more crystals and Crystal Stickles were used on the earrings.
 Here you can read the quote easily, I hope you will agree, it is a real cracker.
 After air brushing I added some bronze gilding wax to the edges of the pages and a blast of gold glitter spray for no other reason than I wanted to :)


Ingredients:-
  • Image - Marilyn by IKEsART
  • Colouring Medium - Promarkers
  • From my stash - skeleton leaves, gesso, silk leaves, metal flowers, metal love, gold glitter spray, Stickles, crystal gems, gilding wax
I am entering this project into the following challenges:-

Monday, October 5, 2015

Delphinium Fairy

Morning everybody, hope you are having a happy day :) :) Today I am sharing a card I have made with you using the image Delphinium Fairy by Gabriella Szabo available from the store in digi format.  
To begin with I coloured the image with Polychromos and then added a background using Pan Pastels.  I also added the leaf at the bottom of the image.  Next, using a square card blank, I cut my image to fit and fully cover the front.  Not having done this before as I do love mounting my images using dies I was struggling with the inner feeling of how flat it felt :) :) :) Next I die cut in white the Wildflower Corner die from Memory Box and then coloured the leaves and flowers using Promarkers to tone in with my coloured image and added blue embossing powder to the small blue flowers.  Finally a sentiment was added and some lace which I also coloured with Promarkers.

Ingredients:-
  • Image - Delphinium Fairy by Gabriella Szabo
  • Colouring Medium - Polychromos, Promarkers, Pan Pastels
  • Dies - Wildflower Corner from Memory Box
  • From my stash -  lace, embossing powder
Challenges entered:-


Sunday, October 4, 2015

Cause Doodle Ribbon

Hello folks.  We have another challenge at One Stitch At A Time so how about popping over to see all the fabulous creations by the design team.  The prize this month is an awesome digi pack containing several images and a paper pack too - how cool is that.

Challenge #247

Theme 'Think Pink' 

Hi folks, hope you are having a good day :) :) For my DT creation this fortnight I have the change to work with an artist I love :) CraftyGirl Creations.  CraftyGirls artwork always reminds me of my youth somehow, I think it is all the swirls and doodles that appear in her artwork :)  Anyway, this time I am using the image Cause Ribbon Doodle which is perfect for out Think Pink challenge.

I have made simple card as I really wanted the image to be the star of the show.  For the lacy edges I used Spellbinders A2 Scalloped Borders 1, a die I recently bought and I suspect if going to be a favourite :)  For the inside and middle layer of the card I used some heart pink paper I have had for ages and ages.  The two white layers are white linen card and the top layer is also white linen card covered with lace and finished off with three pink pearl brads.  The text was cut using Die'sire - Thinking Of You.


I printed the ribbon image and coloured it with Faber Castell Polychromos. Next was fussy cutting the image and mounting on white card. This was then cut slightly larger than the image. The next layer is the same heart paper I have used throughout and mounted on card before cutting.  Finally the bottom layer is white card again. The top two layers were glued together and the foam tape was used between each of the other layers so I have lots of height on the card.  To finish off the image I went over the black swirls with a white pen then added Liquid Pearls to each of the leaves and the intersections on the lattice section.
For the inside of the cut I used Spellbinders - Diamond Essence.


Ingredients:-
  • Image - Cause Ribbon Doodle by CraftyGirl Creations
  • Colouring medium - Faber Castell Polychromos
  • Dies - Spellbinders A2 Scalloped Borders 1,  Die'sire - Thinking Of You and Spellbinders - Diamond Essence
  • From my Stash - Brads, lace and Liquid Pearls
I am entering this card into the following challenges:-
Thanks for looking and hope you have a happy crafting day:)